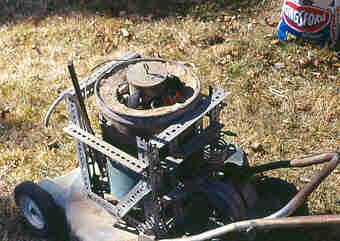

Ugly but effective,
this furnace built from scrap steel and mounted on an old lawnmower chassis will liquefy up to 70 cubic inches of brass or aluminum in minutes. The lawmower handle folds in half to allow the unit to be conveniently stored under a shelf in the garage.
Why a foundry?
The home foundry, next to the drill press, lathe, and bandsaw, is probably the most valuable addition to the telescope maker's tool chest I can think of. I could never count the number of times in the past that I have had to alter my telescope designs because I could not come up with the pieces of metal I needed. Either the lack of tooling to handle the size and/or shape of the part, or an unwillingness or inability to pay the price in time and/or money to buy a large, expensive piece of metal only to spend hours reducing most of it to chips, has brought the project to a standstill or aborted it before it even started.
Most tools convert large pieces of metal into many smaller pieces to produce the desired object. The foundry works the other way around, providing the telescope maker with the ability to turn small odds and ends of scrap aluminum or brass into larger pieces of metal that are very nearly finished as the desired part.
Think about a cell for a six inch refractor lens for a moment. To produce this item using conventional machine shop techniques would require you to purchase (at no small cost) a length of seven or eight inch diameter aluminum round stock sufficient to yield the cell itself, the lens retaining ring, and the cell base or mounting flange to fit the cell to the tube and provide for squaring on, or collimation. That is at least two cuts through an eight inch diameter piece of metal! (Well, at least one, anyway. The retaining ring blank could be sawn from some plate metal.) Still, that is no small task for the home workshop. The pieces must then be bored out to the point that very little of the original metal is left! Visualize several twenty-dollar bills sprouting wings and flying out the window. Heaven forbid you should make a mistake and have to buy another piece and start over.
Now consider a ten inch diameter end ring for a telescope tube. Start by acquiring at least a ten and one quarter inch square piece of three quarter or one inch thick aluminum plate and laboriously saw out the disk. Drill a hole through the disk large enough for your bandsaw blade near where the inner edge of the finished ring will be. Remove the blade from your bandsaw and cut it. Feed the blade through the hole, re-weld and grind it, then mount it back on the bandsaw. Make your cut for the rough inner diameter of the ring. Remove the blade from the bandsaw, cut it again to remove it from the sawn out ring and re-weld it again, being ever thankful that you didn't have to do all that sawing by hand with a vise and coping saw because you had the where-with-all to buy a blade welder (big $) for your bandsaw! After sawing the outer circumference, the ring is ready to be finished up on the lathe.
Now think about a large, spoked worm wheel or setting circle. I guess I don't need to go there. You get the picture.
Enter: the Foundry!
Need a ten inch tube ring? Just saw one out of plywood. Don't worry about having to cut and re-weld your bandsaw blade, just saw right through the ring to cut out the inside. Being wood, you can rejoin the ring by putting a little glue on the faces of the cut and clamping it together until dry. Give it a slight bevel on the inner and outer edges on the disk sander, seal the wood with a little waterproof glue or poly-coat, and you have a form (or pattern) that can be used over and over again to make sand molds for pouring ten inch rings.
Pack a little sand around it, pull the pattern out of the sand, let the sand dry, then melt down some of that scrap metal in your scrap bucket and pour it into the mold. When the metal cools, pull it out of the sand and finish it up on the lathe. (There is a little more to it than that, but that's the process in a nutshell. I'll go further in depth into sand casting in the following paragraphs.)
The point is, you didn't have to locate a source, or pay out the money for that ten inch square piece of thick aluminum plate. You didn't have to saw out the aluminum, and the little bit of wood sawing you did won't have to be repeated the next time you want a ten inch ring. Furthermore, you have put to good use all those little pieces of scrap metal that were good for little else. And as long as you are pouring one, why not pour an extra one or two parts while you're at it? It's just a matter of packing a little more sand.
With a little ingenuity and resourcefulness, you can set up a very nice foundry for a small fraction of the cost of that one piece of metal you were going to buy for that end ring.
I have never even bothered to look at prices for commercially produced foundry equipment, other than a crucible, because most of what you will need is very easily produced at home for very little cost, and the cost factor is why I started making telescopes in the first place. Even the crucible is easily substitued with scrap steel.
In the following paragraphs I will describe what I did to provide the ability to make castings at home. I certainly can't say I did it the best or easiest way, as I have never had any training in metal casting other than what I have read in library books and the writings of Russell Porter and others in the ATM books. I've never even visited a real foundry to see how it's done by the professionals, but it has worked out well in spite of my ignorance.
Perhaps this will at least give you ideas for doing it better than I have. I imagine that any professional foundryman reading the following paragraphs would cringe, but I'll just describe what I have done.
The Furnace
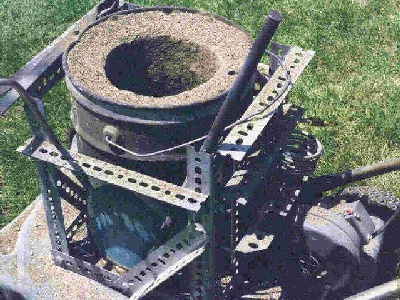
The simplest form of furnace is just a hole in the ground with a pipe running through the ground and through the wall of the hole, furnished with a blower of some sort. A bellows would work, but an electric blower is so much nicer! You may not wish to have a hard-baked and trampled-around hole in your backyard, so constructing a furnace of a more portable nature as described below may be a better choice. You could even make a draft furnace with a ten or twelve foot piece of steel irrigation pipe hung from a tree as a smokestack. All that is needed is a means to furnish the fuel with a draft of air.
The drawing below may be worth a thousand words, but I'll briefly describe my setup.
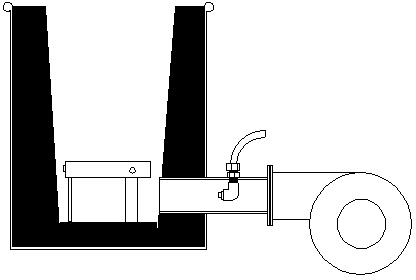
I started with an old steel five gallon oil bucket and cut a hole in the side to allow the blower duct ingress to the combustion chamber. Two firebricks were put in place in the bottom of the bucket to form the floor of the chamber. A piece of sheet metal was rolled into a seven inch diameter cylinder with a slight taper (to allow later extraction) to serve as a form for molding the walls. This was placed on the firebrick floor and centered in the bucket. A piece of the 2 1/4 inch material used for the blower duct was inserted through the bucket wall to act as a form for the blower duct hole. This made about a two inch thick wall, and left about two inches of clear space around the melting pot (or crucible) to serve as combustion space and clearance for the lifting tongs.
The walls are made of what the old timers call "ganister", which is a mixture of equal parts crushed firebrick and fire clay, mixed like cement with water. Larger pieces of firebrick and pieces of coat hanger wire were added to the bucket when making the walls to act as a strengthening reinforcement for the ganister, much like re-bar is used in cement structures. The sheet metal form was extracted after several hours, but as with cement, allow at least a week or two for the ganister to set up and cure before heating it up.
The blower is a 3000 rpm 1/125 horsepower squirrel cage fan with a damper over the inlet to allow airflow regulation. The blower is attached to a six or eight inch length of 2 1/4 inch steel fence post that serves as the blower duct. You don't want to use copper pipe here since copper would melt.
Let the first time or two that you fire up the furnace be practice runs, to allow the ganister to temper, as when firing pottery. The first time or two that I fired mine up, numerous little chips or flakes of the material were continually popping off of the heated surfaces, and several small cracks formed in the walls. Perhaps I didn't allow enough curing time, and the popping pieces were due to pressure formed by steam from moisture still in the ganister. Perhaps a wood fire built in the furnace would have served as a more gentle curing agent. These cracks can be filled with fireclay, but that too must be fired and tempered. Eventually, after a few firings, the wall will be hard and stable. I have been using my furnace for well over a decade now, and it is as firm and hard as a rock. Well, I guess it is a rock!
Firebrick and fire clay are available from building materials stores that carry a good selection of masonry materials, or from welder's supply firms. The fireclay comes in twenty pound bags, and is a very fine powder until mixed with water. Wear a dust mask when working with this stuff. The bag it comes in mentions something about silicosis.
I never have figured out an easy way to crush the firebrick. Maybe you will come up with a better plan. I just put the brick in a bag made from the leg cut from some old blue jeans, and then proceeded to beat it with a hammer. This wasn't very satisfactory as the denim material rapidly weakened and holes began to form in it as the work progressed, but I eventually crushed enough to get the job done. In hindsight, the stuff that firebricks are made of is probably available in bags.
I currently use simple charcoal briquettes to fuel the furnace, but I initially designed it to run on propane or LP gas. For this, a small right angle pipe fitting was brazed into a hole in the blower duct near the blower such that it extended into the center of the duct, and a 1/4 inch compression fitting attached to the outside to allow the gas to be injected directly into the air flow. A pipe plug with several small holes drilled in it to serve as a mixer/burner was screwed onto the inner end of the pipe elbow, but probably wasn't necessary. 1/4 inch stainless steel tubing connected the compression fitting to an eighteen pound propane bottle which I scrounged from a camper. I kept this bottle about ten feet away from the furnace when in use.
A small grate was made to keep the crucible up off of the floor of the furnace to maximize its exposure to the heat of combustion. This was made of a ring of 3/4 inch steel band, with three steel legs attached with 1/4 inch steel bolts (don't use brass screws as they will melt). This is topped with a small piece of expanded steel . Another small piece of expanded steel is placed across the opening of the blower duct when using solid fuel.
An angle iron frame was screwed together to fit around the bucket and provide a firm support for the blower, and then bolted to an old four-wheeled lawn mower chassis to provide mobility for the furnace so that it can be easily wheeled from the garage to the yard. It is an ugly beast, but it certainly makes beautiful things! The lawn mower handle, by loosening two nuts, can be folded in half, which allows the whole thing to be stored under a shelf and out of the way.
The first few melts I did with this rig were done with the propane, but I felt that 1/4 inch tubing may have been a little too small for the long run from the propane bottle. At any rate, it turned aluminum into liquid in short order. A short time thereafter I sold the propane bottle. That is when I switched to charcoal briquettes as my fuel, and have been very pleased with its performance ever since. The charcoal is messier to deal with, but seems to get much hotter, burns much quieter (the gas fuel would roar), is more readily available at short notice, and only costs three to six bucks for a twenty pound bag, which will melt at least three or four hundred cubic inches of aluminum. I never did get around to replacing that propane bottle. I never really felt comfortable around it anyway.
There is one drawback to using charcoal as fuel that I should mention. It seems some manufacturers of the briquettes are mixing sand or some other inert ingredient with their charcoal, presumably to lower their costs per pound of product sold. When doing several melts at a time, this sand collects in the bottom of the furnace and eventually starts to choke off the air flow, which drastically increases the amount of time required to liquefy a charge of metal. I have had to pause in the middle of a melting session to remove the contents of the furnace and scoop out the sand so that I could finish the job.
The worst case has been after about the second charge of metal, using a very obscure (and inexpensive) brand of charcoal, but all the brands I have tried do this to a greater or lesser degree. You get what you pay for. Kingsford is one of the more expensive brands, but has proven to be the best I have found. The briquettes are smaller than most, allowing more fuel in the combustion chamber, and they seem to burn longer with a more intense heat than the less expensive brands. I believe that in the long run, using good charcoal is more cost effective than using the bargain-basement brands.
A re-design of the furnace would include a door at the bottom that would allow a quick clean-out, in addition to a safety hole for the escape of liquid metal in the event of crucible failure (see below).
I suppose regular lighter fluid or kerosene would light the charcoal just as well, but I use a standard small propane bottle of the sort used with a hand torch. I have a valve which screws on to the torch bottle. Attached to this is a length of surgical rubber tubing which is pushed on to the gas inlet fitting on the blower duct. To charge the furnace I place a layer of briquettes directly on the grate in the bottom then place the charged crucible on top of that, filling in the space around the crucible with briquettes clear to the top of the furnace except directly above the blower duct. The blower is then turned on, and the damper set to allow only about 20 or 30 percent of maximum air to flow into the chamber. Then I light a small twist of newspaper and push it down into the combustion chamber, stand back a bit, and crack the propane valve. In a couple of seconds I am made profoundly aware of the instant the propane/air mixture reaches the burning newspaper.
I then fill the remaining space in the chamber with briquettes. After a few minutes, the charcoal has begun to burn on its own, so I turn off the propane, remove the tubing, and put it away. I keep the airflow low until the briquettes are burning thoroughly, then allow about 50% airflow for most of the melt, turning it up to maximum for a few seconds every few minutes to maximize the temperature of the charcoal in the chamber. Leaving the airflow at maximum will only blow most of your heat out of the furnace, and actually cause much lower fuel economy and longer melt time. The charcoal is usually fully burning within ten or twenty minutes, and by the time an hour has passed, I have already poured one or two melts, and I'm well on the way toward the second or third.
When running the furnace on propane, a lid with a four to six inch exhaust hole (or even just a couple of firebricks placed on top of the furnace) helps retain a large amount of heat. When burning charcoal, I place a few pieces of the metal I am going to add to the crucible around the top of the furnace to serve as a bit of a "lid". This is an efficient way to pre-heat the metal and makes it melt much faster when added to the crucible. Keep an eye on it though, or it will melt and run down into the furnace before you have a chance to get it to the crucible!
When doing multiple melts, it is a good idea to leave a little liquid metal in the crucible after a pour. It will increase the rate of heat transfer to the next charge of metal, decreasing the melt time.
Over all, I have been very pleased with this unit, but I foresee a time when a larger furnace will be in order. Perhaps one made from a thirty gallon oil drum ...
The Crucible
I have read that a graphite crucible is the way to go, but when I was first getting interested in casting metal and considering the possibility of setting up a little foundry, the price of a small graphite crucible was beyond what I was willing to invest. My pile of metal odds and ends contained a length of 3-1/2 inch thick-walled steel pipe that I had dragged home from who knows where, thinking that it would someday make a nice pedestal mount for a Newtonian telescope. I remembered what John McQuaid had said about using steel pipe for a crucible in Advanced Telescope Making Techniques Vol. 2. Then my do-it-yourselfer nature kicked in, and I visualized eight or ten inches of that pipe sawn off with a piece of 1/4 inch steel plate welded to the bottom, and suddenly realized that a foundry was in my not-too-distant future.
I quickly sawed off that piece of pipe and a matching piece of 1/4 inch steel plate, and borrowed a little buzz box of an AC arc welder. It wasn't welded very well, but it would hold water! That first crucible lasted about five melts, then burned through the side where my poor job of welding had weakened and thinned the metal, and spilled about fifty cubic inches of aluminum into the bottom of my furnace where it hardened around the legs of the little grate table. It also ran down the blower duct, stopping two inches short of hitting the blower. Oops! I had quite a time getting that chunk of metal out of my furnace. In retrospect, it is probably a good idea to have a safety hole in the bottom of the furnace, plugged with a thin piece of aluminum or lead sheet metal that could melt through in the event of another defective crucible, with a steel pan under it to save the metal. My next furnace will definitely have one. I was lucky that time!
I then took the remainder of that would-have-been pedestal to a professional welder, described what I wanted, and in twenty minutes had two new crucibles, beautifully welded, for a cost of about fifteen dollars. Those crucibles have lasted to date, through many, many melts. I use one for aluminum and the other for brass. Each holds about seventy cubic inches of liquid metal.
A little reminder: don't make a mold bigger than the capacity of you crucible! Also, never use a crucible that was used for aluminum to melt copper-based metals like brass. This can cause the brass to be gassy with many bubbles and voids in the casting.
Be sure to make a lid for your crucible to keep ash and debris from falling into your metal. This will help minimize the absorption of combustion gases into your metal and help retain the heat in the crucible. A round piece of 1/4 inch steel plate slightly larger in diameter than the top of the crucible works fine. Drill a hole in the center of the lid for mounting a large steel eyelet to serve as a handy means of lifting the lid with tongs or a hook.
Tongs and Other Handling Tools:
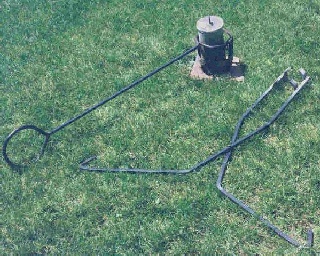
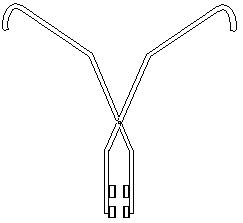
You will need a good sturdy set of tongs for lifting your crucible from the fire. I made mine with two pieces of ½ inch steel square stock joined together with a 1/4 inch bolt to serve as the pivot, with the nut soldered in place to keep it from loosening or tightening up on you. Two nuts jammed together would work fine too.
The steel stock can be softened and bent by hand by holding it in a vise and heating the spot where you want the bend until red hot with a torch. I found that one of the commonly available small propane torches was just a little inadequate for the job, but two torches worked quite well. The handle ends are bent to make for easier lifting action, like the illustration below.
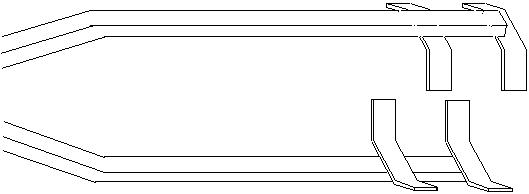
The next figure illustrates that the hot ends of the tongs have two pieces each of one inch steel band welded to the tips to provide positive gripping action.
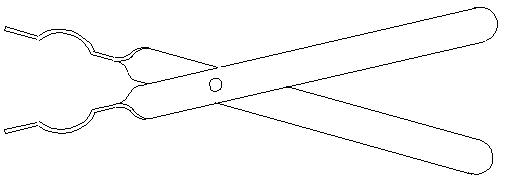
A smaller set of tongs made from some steel band is very useful for manipulating the crucible and its lid while in the furnace, adjusting the charcoal, adding metal to the pot, and any other minor handling of hot items needed around the furnace. The figure below shows the pattern for bending two pieces of 3/4 by 1/8 inch steel strap to form these tongs. Fasten them together with a bolt and nut arrangement as with the lifting tongs.
Another required item is an implement in which to place the hot crucible to allow for pouring. Mine is a length of ½ inch steel round stock with two loops bent into the ends, oriented ninety degrees apart. One loop for the crucible, and the other loop to serve as a leverage-providing handle when pouring. (Just a bend in the handle end would serve well.
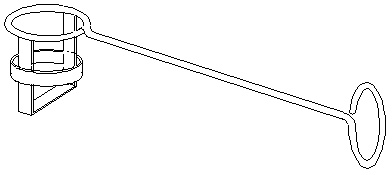
I originally made the other loop to serve as a cradle for a different-sized crucible, but as yet haven't needed to complete it.) The ends of the loops were then welded to the main shaft for added strength. At the crucible end, one inch steel band was bent and welded to the loop to serve as support for the base of the crucible, and another piece formed into a ring and attached to serve as a cage to keep the crucible from slipping out sideways.
The Sand
I have read that there is no substitute for good, fine casting sand, and I believe it as my early experiments with common sand proved completely unsatisfactory for packing and retaining its shape when dry. I had no idea where to acquire good casting sand as there is little or no industrial foundry work going on in my area, so as a true dyed-in-the-wool do-it-yourselfer I set about to make my own.
The first step was to provide a place to keep the sand. I didn't want to store it outside where it would become useless during the winter months from freezing, and by the little presents left by the neighborhood cats when thawed. A trip to the local discount store produced a large tough plastic tub with a sealable lid that keeps the sand moist and the cats out and can be kept in the basement where it won't freeze. It measures about a foot and a half long by a foot wide, and about sixteen inches tall. I keep about two or three cubic feet of sand in it, which to date has been plenty though I foresee buying another.This item is made by Rubbermaid, is labeled Roughneck, and has served very well. It has proved tough enough to withstand the abuse of using a garden shovel to mix and manipulate the sand. When a casting is complete, I just set the mold (or flask) in the tub and knock the sand out directly back into its container where it is moistened again and chopped and mixed with the shovel.
The commonly available sand in my area proved to be much too coarse a grade, so I went to the local masonry supplier and bought a couple of 100 pound bags of silica sand, or 7030 crushed industrial quartz. The number means that 30 percent is retained on a #70 mesh. Other information on the bag indicated that it was rated to provide a one mil surface profile when used as an abrasive, or a 0.1mm effective size in filtration. It also warns to wear a dust mask when using it. This stuff is beautiful, fine and white, but I found that its packing quality when wet is zero!
Russell Porter had mentioned something about foundry sand having clay in it as a binder in Amateur Telescope Making Vol. 2, and I had noticed that the soil in my yard, which has a high clay content, packed very well and I thought about the bag of fire clay powder that was left over from building my furnace. Two and two added up, so I dumped some of the fire clay into the sand and mixed it up as well as I could with a shovel. The more fire clay I added, the better the sand packed so I continued adding it. The final mix is probably 25% fire clay and packs quite well, but having no experience with real foundry sand, I don't know the difference! I do know that I have been able to produce some very nice smooth castings when the molds are well dried. A book on the subject of founding that I read recommends around 15% clay for brass, and 20% clay for aluminum. I have used this stuff for both, and have had good results.
I have noticed two interesting facts regarding the use of this homemade and overly-clayed foundry sand. The first is that after the metal is poured and has cooled, the molded sand is baked pretty hard and tends to retain its shape and the metal contracts when cooled. If the casting is fairly shallow in height with tapered sides, and the cast part is removed carefully, the mold will stay intact and can be immediately re-used! Once I was able to pour three parts in the same mold before it deteriorated to the point that it could no longer be used. That was a rare case though. Each itteration produced a poorer surface than the preceding.
The second interesting fact is that the sand seems to be improving with use! I imagine that this is due partly to my gaining experience in using it, but mostly due to the sand and clay gradually being mixed together more evenly with repeated use.
The books say that the sand should contain 6% to 8% moisture. In my initial attempts at casting, I probably had way too much moisture. This was evidenced by much steam coming from the mold when the metal was poured, and it produced very ugly casting surfaces. More than one aluminum casting I did bubbled up like pizza crust. I suppose that pouring hot metal into an overly-wet and under-vented mold could result in sudden and violent consequences. I then began letting my molds thoroughly dry over the space of a couple of weeks. This produced much better castings. With experience I have learned to tell how much moisture I can get away with. I have even used a propane torch to dry the surfaces of an overly-wet mold somewhat on the same day I poured the metal, and had good results. Most of the time, I still let my molds dry for a few days just as extra insurance. For the beginner I recommend letting your molds dry thoroughly.
My first couple of wooden flasks were sealed and painted to keep the wood from absorbing moisture from the sand, but I have since found that this is really an unnecessary waste of time in my dry climate. My unpainted flasks have stood up well, and could be easily replaced if ever it became necessary. You will also need to provide pieces of plywood to serve as bottom supports for your flasks. Seal and paint these though, to prevent warping as they absorb a lot of moisture from the sand while the mold is drying.
Parting Dust
You may find that small pieces or sections of your packed sand mold will occasionally stick to your pattern when lifting it from the sand. This annoying tendency can be greatly reduced or eliminated by sprinkling a small amount of dry, non-absorbent powder over the pattern before packing the sand. This is a requirement when making two-part molds, to keep the sand in the two halves of the mold from sticking together and tearing each other apart. I have had no experience with commercial products, but have found that the dry crushed quartz silica sand I used as the main ingredient in my casting sand works pretty well. I keep some in a coffee can on the bench when I do my sand-packing.
Pattern Making

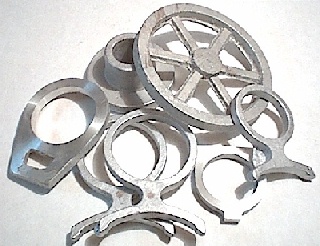
The probability of producing a successful casting seems to be proportional to the care that goes into making the pattern that the sand is packed around. When designing your part, keep in mind the fact that there can be no portions of it that protrude or will interfere with the sand when lifting the pattern from the mold. Give all vertical surfaces a slight taper or bevel that will allow the pattern to effortlessly release from the sand. Just one or two degrees is plenty. The books say 1/8 inch per foot draft for deep patterns, and 1/16 inch per foot for shallow ones. Avoid any abrupt angles in the design that would make a sharp corner in the sand which would be prone to breaking off or washing away during the pour. I have used vinyl spackling compound to make fillets with great success. Just smear it on then sand it down to shape when dry. Even wood glue will work on small parts.
Common pine boards make great pattern material. For thicker sections, two or more layers can be glued together. I have used common plywood to make many patterns of large diameter that would be prohibitively expensive if made from solid wood. Plywood needs a little extra care: voids need to be filled, and the stuff doesn't easily sand smooth, but it is cheap! Voids can be filled with wood putty made from sawdust and wood glue mixed together. A layer of wood glue smeared over plywood patterns will serve to seal and smooth the surface when dried.
Give the pattern a smooth, hard, shiny surface. I have used patterns with only the wood glue coating with success, but find that a thoroughly dried coat or two of good oil-based enamel (like Rustoleum) makes a noticeable improvement!
Other Tools
A riddle is basically a sieve with which to sift out the larger clumps when initially adding sand to a mold. Mine is just four pieces of board nailed together to form a ten or twelve inch box frame with wire mesh stapled to the bottom. Use heavy gauge mesh of about 1/4 inch pitch. If you can't find 1/4 inch mesh, two pieces of ½ inch laid together and offset from each other 1/4 inch will work just fine. To use it, just add a couple of large hands full or cups full of sand at a time, and shake it back and forth over the mold for a few seconds until the fine stuff has fallen through the mesh and there are only little balls of sand left in the riddle. Dump out the little balls, add another cupful, and repeat. This ensures that only the finest sand comes in contact with the pattern. Clumpy sand will not pack into complete contact with the pattern, resulting in a casting with poor surface quality. After you have covered the pattern with ½ inch or so of the riddled sand, the remainder of the flask can be filled up with the clumpy stuff.
A piece of clothes-hanger wire makes a great vent wire. Make it long enough to reach to the bottom of your tallest flask and put a little loop in the end to protect from poking yourself in the eye. Venting the mold not only hastens the drying of the mold but facilitates the rapid escape of gasses from the sand when the metal is poured. This is very important.
The ram is the tool used to pack the sand. I have seen pictures in books that show it to be a wooden handle with a tapered wedge-shaped flat on one end, for packing the sand around the inside of the flask, and with a large round flat on the other end for packing the remainder of the flask. I just use a ten or twelve inch long piece of wood about 1 ½ inch by 3/4 inch in cross section to serve as the small end, and the end of a foot-long piece of 2x4 for the big boy. Works fine.
The rod is just that. A foot-long piece of 3/8 or ½ inch metal rod with one end ground to a point, which is placed into a small hole or dimple provided in the pattern for the purpose.
The rapper is used to rap the rod which transfers the force to the pattern. Rapping serves to add a small amount of lateral compression to the sand immediately surrounding the pattern and open up the mold slightly, which greatly aids in drawing the pattern out of the mold. This also serves to smooth the surface of the mold a bit, thereby improving the surface texture of the casting. The rapper can simply be a 2 ½ foot piece of metal rod bent in half, with a 2 inch gap left between the ends. A quieter option is to simply use a foot-long piece of 2x4 with a 2x2 inch notch sawn out of one end, and the other end cut down to serve as a handle.
Place the point of the rod into the pattern, and gently rap the rod back and forth a few times in each direction, until a very slight movement can be seen between the pattern and the surrounding sand.
The striker is the blade you use to scrape off excess sand from the mold, making the surface of the sand flat and level with the top (bottom) of the flask. A piece of 1 or 1 ½ inch angle iron long enough to extend past both sides of the flask will work famously.
Other miscellaneous tools will include things like a short, narrow strip of sheet metal with a bend in one end to serve as a little scoop for lifting loose sand and debris from the interior of the mold cavity; a small spoon for repairing damaged molds and forming and smoothing gates and risers; and a short piece of ½ inch metal tubing with a sharpened end for cutting gates and channels. A short piece of rubber tubing for blowing out small debris can come in handy too. A carpenter's level should be on hand for ensuring that your open-faced molds are laying flat and level before pouring.
Making Molds
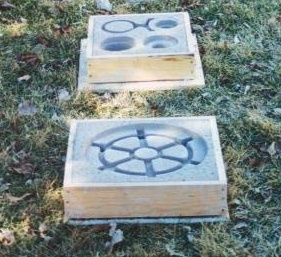
For speed and simplicity, as often as possible I will design my parts such that a simple, single-piece, open-faced mold will serve. This eliminates the complications of dealing with a cope, sprue, risers, and alignment. It is true that the face of the metal open to the atmosphere will have a layer of crystalized metal on top, but when the castings are machined all over it makes no difference.
Here are the steps for forming a sand mold:
1. First of all, select a flask of sufficient size to allow an inch or two of sand between the mold cavity and the wooden sides (and/or bottom board) of the flask. For two part molds, bigger is better - more weight to hold the metal in place and keep the cope from floating up and allowing leakage between them.
2. Place the upside-down drag on a molding board that is large enough to contain it. (Do NOT use your wife's cutting board from the kitchen!) Place the pattern in the drag upside down and sprinkle them with parting dust.
3. Riddle enough sand into the flask to cover all parts of the pattern at least ½ inch deep, then press it into firm contact with the pattern using your hands. When this is done, you can heap enough un-riddled sand into the drag to cover the pattern by two or three inches.
4. Using a small ram, pack the sand firmly around the drag. Go around it twice. When this is done, go ahead and pack the sand over the rest of the mold using a larger ram, add two or three inches more sand, and pack again. Continue this until you have packed sand to about 1/2 inch above the flask. You don't have to hammer the sand with the ram, just thump it down good and firm. The idea here is to produce an even density throughout the mold.
5. At this point you can strike off the excess sand by cutting down into it with your striker to the edges of the flask, and scraping it off to form a smooth surface level with the flask. Take multiple cuts, removing just one or two inches at a time. You may want to fill in any uneven areas with more sand, pack it lightly, and strike it off again. For larger parts, it is a good idea to vent the sand under the pattern. Push your vent wire into the sand just far enough to come within ½ or 1 inch of the pattern, once every square inch or so.
6. Scatter some loose sand (1/4 inch deep or so) over the mold, place the bottom board on it and rub it in with a circular motion to form a complete and solid contact between the sand and flask. At this time, holding the bottom board (and the molding board) in good contact with the flask you can pick up the mold, turn it over, and remove your molding board.
7. Vent the mold by pushing your vent wire straight down into the sand all the way to the bottom board, once every square inch or so over the entire surface of the mold, but no closer than ½ inch to the pattern. Lightly brush or blow off the inevitable particles of sand that will be broken up around the vent holes when done.
If this is a single-part mold, you can rap and draw the pattern now. Other than dry-out time, you are finished. In this case, after drawing the pattern, very gently, using the corner of a bent knuckle or the little corner where the thumb meets the palm, compress and round off the top edge of the mold cavity just a tad to reduce the risk of small pieces of sand breaking off and falling into the mold. Don't do this to two-part molds though.
For two-part molds, here are the remaining steps:
8. Mark off your gating on the drag. Just draw it into the sand - it will transfer to the cope sand. Apply parting dust evenly over the drag and pattern, then place the cope onto the drag, and repeat steps 3 and 4.
9. Vent the cope sand with your vent wire and cut the sprue if you didn't mold it in (suggested). Lift the cope and finish it by cutting any gates or risers and the funnel shape of the sprue's pouring basin.
10. The books by the pros say to dampen the sand around the pattern with a small brush prior to rapping and drawing the pattern. I have experienced no benefit in this, so I don't do it; but perhaps my sand is already too wet or I just haven't learned the knack. At any rate, rap and draw the pattern, cut your drag gates and clean any loose particles from the drag.
11. Finally, very gently place the cope back on the drag, and cover the sprue and risers to prevent foreign material from falling into your mold.
12. Let the mold dry out for a week or so.
When preparing to pour, let the melt get hotter than just liquid. The hotter it is, the more fluid it will be when pouring, which will help to prevent cold shuts and incomplete filling of the mold. Let aluminum get beyond just shiny liquid; it should be glowing pink or slightly red. Same for brass - heat it until it's glowing red before pouring.
When designing your pattern, remember that smaller, thinner portions of the metal will solidify first, and the thicker portions of the casting will supply liquid to the smaller ones as they solidify. The thicker portions will therefore tend to contract toward their edges, causing a shrink, or void, in their center. To ensure homogeneity, be sure to place a large riser, or reservoir near the larger portions of the cavity to supply liquid to the casting as the metal solidifies.
Foundry Safety
Here are a few points to ponder that may save life or limb:
Never let any water come in contact with molten aluminum (or any other metal for that matter). The result is sudden and violent. Have you ever seen the work of a fragmentation grenade? 'Nuff said. It should therefore go without saying that you should never try to douse an inadvertent grass fire started by a metal spill with water. Keep a bucket of sand nearby for the purpose.
Proper clothing for metal casting cannot be over-emphasized either. Provide protection from nose to toes. Wear sturdy, high-topped leather boots, preferably with steel-reinforced toes. Wear loose-fitting leather clothes, or at least clothes made of a material that is fairly flame resistant. Definitely not nylon! Welder's leathers are an excellent choice. Or even riding chaps and an old leather jacket. For the face, safety glasses are an absolute minimum. It is wise to wear a full-face shield as well. Wear a hat! A backwards baseball cap under the face shield will help mitigate the effects of sparks falling in your hair. Leather or asbestos gloves should be obvious.
Always think about what you are doing. Always think about what could happen in the event of an accident, and the appropriate actions to take.
Never run your foundry when you are home alone.
Sources for Metal
Avoid small, thin pieces of aluminum like cans, foil, small sheet metal leftovers, and chips from your drill or lathe. Stuff like this, that has a small volume to surface area ratio, has a proportionately high loss to oxidation. In other words, your melt will have a high dross content. Stick to chunky stuff. If you must use thin stuff, compress it as much as possible, then submerge it in a melt that is already liquid. Bear in mind that good metal makes good castings. Nice clean chunks of aircraft aluminum or old lawnmower engines will make much nicer castings than molten blobs of empty beer cans.
Brass, on the other hand, will usually be pretty satisfactory from whatever source. Avoid thin pieces of brass scrap that are nickel plated, though. I once collected a large bag of little nickel-plated clips, with the hopes of melting them down, but found that the nickel melted at such a higher temperature than the brass, that I had to continuously mash the clips while I was melting them to squeeze the brass out of it's plating. This turned out to be completely unsatisfactory, as the melt was mostly dross and yuk. I wound up throwing the whole lot away, about forty pounds of brass!
If you are fortunate, you may manage a deal with a local machine shop or two to haul their scrap away for them. You may spot chunks of metal at garage sales and flea markets that can be acquired for much less than their scrap metal value, such as old lawn mower engines, vacuum cleaners, auto parts, and boxes of old pipe fittings and lawn sprinklers, though with the rising popularity of recycling materials, more and more people are becoming sensitive to the real value of their metal.
Of course, there is always your local scrap metal yard where you can find an infinite variety of fodder for your crucible. Sometimes even ingots of alloys specifically designed for casting!
Cheers!
- Jim Sapp