F. E. S. S.
Field Expedient Solar Spectroscope
Re-edited for clarity, Summer, 2006.
Are you bored during the day at star parties with nothing to do while waiting for dark?
Using only your pocket knife, make a solar spectroscope from items found in the trash.

This little project will not show the hundreds or thousands of Fraunhoffer lines in the solar spectrum that a good quality spectroscope will; but if put together carefully it will show two dozen or more.
Needed Materials:
- Pocket knife
- A number of empty beer cans (or other beverage of choice)
- Old reading glasses
- Junk CD (AOL, Black Sabbath, The BeeGees, etc.)
- A couple of wooden sticks.
- Duct tape
* The pocket knife is used to cut the ends out of the beer cans.
* The beer cans, when taped together, serve as tubing for the optical path.
* The reading glasses serve as collimator lenses.
* A piece of the CD serves as the diffraction grating.
* One stick, about 1/4 inch diameter and 3 inches long, serves as the adjustable mount for the grating.
* The other stick can be thicker and longer and serves as a brace between the two optical tubes.
* A third stick will be needed to measure the focal length of the reading glass lenses. Say, about 3 or 4 feet long.
* The duct tape is the glue that holds it all together.
Overview
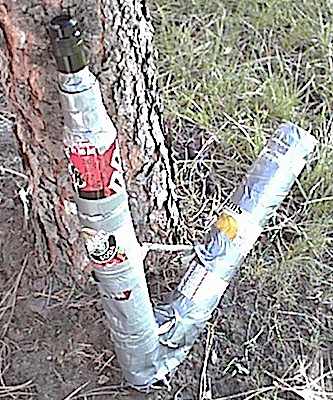
The spectroscope is formed from two lengths of tubing joined at the base to form a "V" shape. The diffraction grating is mounted on a pivoting stick at the base of the"V", with a clear optical path from the grating to the end of each tube. The reading glasses are mounted with each lens inside one of the tubes, just above the grating and centered in the optical paths. The slit is mounted at the end of one tube, coincident with the focal point of the lens in that tube, and an eyepiece (or magnifier lens to serve as one) is mounted at the end of the other tube, coincident with the focal point of that tube's lens.
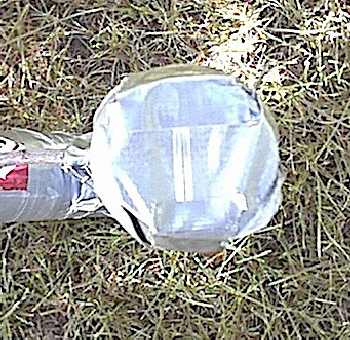
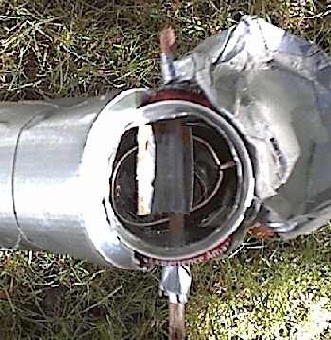
The view on the left below shows the slit at the end of one arm of the "V". It is positioned at the focus of one of the reading glasses' lenses. The view on the right shows some of the duct tape peeled back at the base of the "V" to reveal the CD grating taped to the adjustment stick. One lens of the reading glasses is visible behind it.


Assembly Instructions:
Step 1. Prepare The Optical Parts
A. Take a rectangular slice out of the edge of the junk CD about one inch wide and as long as the radius of the CD. As with any diffraction grating, there are two main spectra. With a CD, the brighter of the two spectra reflects toward the direction of the CD's center hole. Plan to use that one. The piece will be installed such that the brighter spectra will be reflected up the eyepiece tube.
B. Bend the reading glasses at the nose bridge so that the ear pieces bend outward to form a V shape of about 45 to 60 degrees, and the front of the lenses come toward each other to form about a 120 to 135 degree angle.
C. Measure the focal length of the reading glasses in relation to a stick or other long object. The length of this measurement will show you how many cans of * beer you need to drink. The longer the focal length, the more beers you must drink.
[Hint: 1 diopter = 1000 mm, 2 diopters = 500mm, etc.]
* Or the beverage of your choice, but be aware that the metal used to make V8 juice cans seems to be thinner than that used to make carbonated beverage cans and tears easily, so beer is better.
Step 2. Prepare 2 Cans for the Base of the "V".
A. Suck down a can of beer, then cut out both ends of the can with your pocket knife.
Using your fingers, form the bottom end of the can into a square shape and poke two ~3/16 inch diameter holes through opposite sides about an inch from the square end.
Slice a section of the metal from one of the non-hole-poked sides about 1-3/4 inch
wide and 3 inches long, beginning about1/2 inch from the can's bottom (the square end) and
set it aside - you'll make your slit out of this piece later. Set the can aside for now too. We will call this can the "Grating Can".
Suck down another can of beer and cut both ends out of it. *burp*
Slice a section out of the side of this can just like the first can, but this time leave it attached near the top end and extend the cuts along the side completely through the bottom end. Bend the section up and out of the way and set this can aside for now too.
Step 3. Make the Slit Section's Optical Tube
The object of the game is to stack topless/bottomless beer cans together end-to-end to a sufficient length that allows you to mount the slit at the top end of the tube, and the reading glass lens at the bottom end with the focal length of the lens between them. The lens and the grating will be mounted inside the Grating Can at the bottom end. The lens will reside an inch or two from where the grating will be mounted, which in turn will be about an inch from the very bottom of the Grating Can.
In other words, the grating will be mounted about an inch from the bottom of the Grating Can where the two holes were previously poked, and the lens will be mounted about 2 inches farther up the tube. One lens focal length up from there will be the slit, at the very end of the tube.
A. Begin drinking the required number of beers as determined in step 1 above **buurrrrrp** to get to the required tube length. As each can is emptied, cut the ends out of it then duct tape it end-to-end with the previous can. Start at the slit end and work down, eventually ending with the Grating Can at the bottom. You may need to adjust the length of one of the cans a bit in item B, next.
B. Use your measuring stick (from step 1) to mark the distance from the top of your stack where the slit will be, to the point inside the Grating Can where the lens will be located, then poke a hole through the side of the grating can (opposite the side that has the section removed) so that when you poke the earpiece of the glasses through the side of the can (from the inside), the lens will wind up centered in the tube at the focal distance from the slit. This distance doesn't have to be exact, just close (say, within 1/2 inch or so). When the lens is positioned to your liking, secure the earpiece in position on the outside of the can with duct tape.
C. Find a straight stick about 1/4 inch diameter and 3 inches long and insert it through the two previously made holes in the sides of the Grating Can. With a small piece (or two) of duct tape, fix your CD grating securely to the stick, centered, such that the lines of the grating are parallel to the stick and the grating is free to turn back and forth inside the can without hitting anything. This is the wavelength adjustment control for tuning which section of the spectrum will fill the field of view in the finished FESS.
Take two more small pieces of tape and wrap them around the stick at each end adjactent to the outer wall of the can. These will keep the stick from falling out and the grating centered in the can. They will also provide a little drag to the shaft so that it won't pivot too loosely.
D. Now take the other can that you cut and bent out the side of in step 1.
Poke a hole in the side opposite the bent-out section for the other earpiece of the glasses, and slide it down over the earpiece to position the other lens inside it. Bring the bottoms of the two cans together to form the base of the V. At this point you will need
to bend and tweak this assembly to ensure that both lenses of the glasses have the grating centered along their axes. No exacting precision is required. Just keep the grating in both lens' light paths. You can now bend the extra section of the beer can's side down a bit to help secure the two cans together with duct tape. Be sure to secure the earpiece to the side of the can too.
Step 4. Make the Eyepiece Section's Optical Tube
A. Drink more beers. *bhuurrrrpp*... ahhh... - enough to build the other stack to the eyepiece end. *hic*
Cut the ends out of each can and duct tape them together, building your way from the lens in the can at the base of the "V" toward the end of the next arm of the "V" where the eyepiece will be mounted at the focal plane of the lens. Use your measuring stick. The final can may need to have the "eyepiece adapter" built and inserted into it before being taped to the top of the stack, because of the tapered end of the can. Whether before or after, this adapter can be made from any debris laying around and bound together and secured in place with duct tape. Paper works fine, but almost anything will work
B. When this is done, check your work by sighting down both of the tubes, ensuring that the light path goes through both lenses and intersects the grating. Bend and tweak the assembly until the alignment is correct, then use another stick about halfway up the length of the V's arms to serve as a brace to hold the two halves of the V securely in the correct orientation. Duct tape as needed. Be sure to tape the base of the V closed to keep out stray light.
Step 5. Make and Install the Slit
A. Make a slit from the left over scrap of metal that you cut from the side of the Grating Can in step 1. Try to keep the edges as straight as possible. By placing the metal over where the two halves of a table come together I was able to turn the piece into two pieces with nice straight but curled down edges with one slice of the pocket knife. Better results were had by scoring the metal with the point of the knife held against a straight edge once or twice on a hard flat surface before making the cut. The edges came out straight and flat.
Now tape the two pieces together such that the straight edges form a nice slit with a gap of about 0.01 inch wide and about an inch long - less length is okay. Once again, precision is not necessary. The slit gap will be adjustable when installed anyway.
B. Duct tape the slit assembly to the top end of the tube such that the slit is parallel to the direction of the grating's lines. You will now find that the slit is adjustable - squeeze the sides of the can top near the ends of the slit to increase the gap (and brighten the image) or squeeze the other sides to narrow the gap and increase resolution.
Step 6. Adjust, Use, Enjoy
A. Without an eyepiece installed, point the slit end at the sun and look down the eyepiece tube. When pointed directly at the sun you will see a bright slice of sunlight land on the grating from the slit. Turn the grating stick until you see the brightest, widest spectrum. The CD will throw a couple of them. You may need to adjust the tilt of the grating stick a bit to bring the spectrum closer to the center of the light path.
B. Install an eyepiece and enjoy a full field of vivid color. Rotate the grating stick to select wavelength. Sqeeze the slit end to adjust brightness and resolution.
NOTES (in no particular order):
A. To keep it pointed squarely at the sun you will need to prop the thing up on something or bungee cord (or duct tape) it to a tree limb, fence post, telescope, or bino-mount arm.
B. Among many others, you will see the two dark lines in the red end of the spectrum from the absorption of iron and hydrogen alpha. In the orange-yellow you'll see the sodium doublet. In the green you will note the wide grey line of the magnesium triplet. You may need to rotate the grating to a different order to pick up the dark calcium K line in the blue-violet.
C. "Model A" of this device was a single beer can with no collimator lenses and the slit was just the pop-tab pushed back up to form a narrow slit. It would just barely show two or three lines. On the first try with the current "model B", I could only see about a dozen lines. After fidling around with it I accidentaly stumbled upon an orientation that clearly revealed 30 to 50 lines which is a far cry from my real spectroscope which shows thousands, but for field expedience from readily available free parts, not bad.
D. Since the optical quality of the reading glass lenses is probably poor and don't reach a very sharp focus, and the CD grating is not the best of gratings, don't expect a lot. Use a very low power (long focal length) eyepiece. I used a 40mm Kellner, and I
wouldn't recommend anything much shorter. You can use a good quality eye loupe or pocket magnifier for an eyepiece, but it won't give you the nice sharp field edge and full illumination that a real eyepiece will. The little fold-out pocket magnifiers from Ace Hardware are molded plastic and are so bad as an eyepiece that no lines are visible.
At any rate, it gives you something to make for free and provides a good excuse to suck down some brew. *burp* :O)
- Jim Sapp
Summer, 2003
(Instructions re-edited for clarity (without the brewskies), Summer, 2006)
CLICK HERE to return to Jim's Home Planet